I have to tell you how excited I am about this DIY Magnetic Makeup Palette only because it is something that I desperately needed. I’m so happy that I can make an endless supply of them! I buy a lot of palettes but it always ends up that I like some colors better than others which is fine, except when I travel, I have to take the entire palette with me just so I can use those 2-3 colors. My makeup bag ends up bulging with 3-4 different palettes and I know that I don’t need to bring all of them but I really like those specific colors. I did end up buying this large magnetic palette and depotted quite a few of my shadows but at $25 for each palette, they certainly aren’t cheap and I’d almost like to spend that money on more make up, know what I mean?
You can find inexpensive palettes easily by shopping at stores that sell makeup geared towards tweens and teenagers. Forever 21 has this palette for under $9 that would work great. I got mine in store at Forever 21 for around $5 and got lucky since these have a mirror built into them.
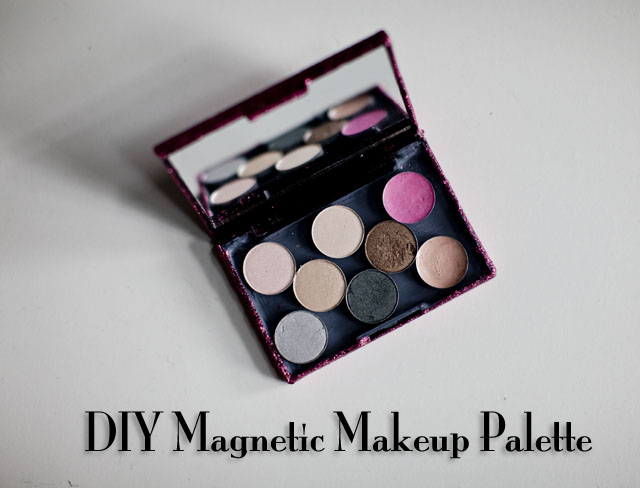
Here’s my finished product! And of course I glittered it too. 🙂

You want to know what my secret ingredient is? Magnetic Paint! I didn’t even know they made such a thing I just googled it, hoping something like that existed and indeed there was! Just a tip, if your local craft store is small it’s going to be impossible to find it as I found most places here didn’t carry it (even my local Jo-Ann’s). I just ended up ordering it on Amazon.
Even though I wasn’t sure it was going to work, I documented the process. So thank goodness it did work!
First your tools:
- Makeup Palette to use as the holder
- Your depotted eyeshadows, blush, etc…
- magnet sheet with adhesive backing
- Magnetic Paint
- Foam Brush

- Mod Podge/Glitter mixture (optional) – see my Glitter Everything Tutorial for instructions on how to glitter anything without getting glitter everywhere!

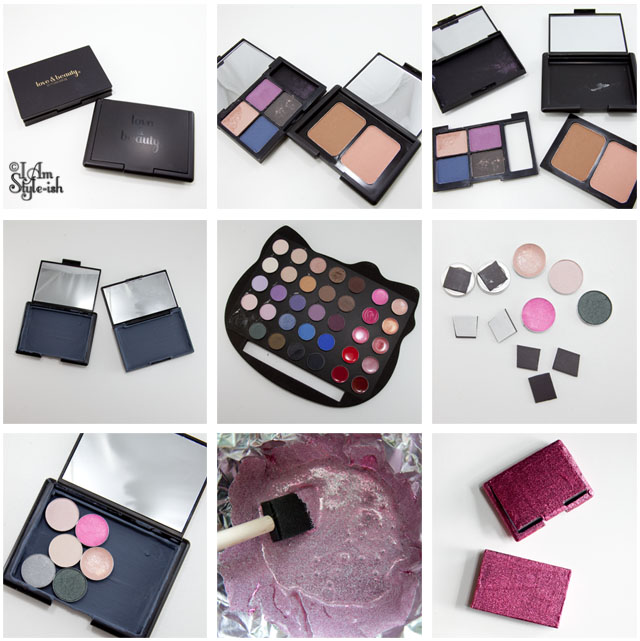
1ST STEP: REMOVING THE CURRENT MAKEUP PANS
- With your palettes, take out the entire part that is holding the current pans. In most of the palettes, you can usually find where it’s glued together and with a little strength, it’s easy to pull off or use a tool to get it underneath and pop it off.
- Clean the glue residue off the inside of the bottom of the palette.
2ND STEP: PAINTING AND ADDING MAGNETS
- Paint the inside with the magnetic paint (it took me about 4-5 coats before I was happy with the magnetic-ness. I tested my magnets to make sure it stuck. You can paint coats every 2-3 hours but once it’s done, let the paint dry overnight.
- Take your palette and depot the pans. This palette was easy as it popped right off. It was just a bit of glue on cardboard but some are harder to depot. (I’m not going to get into depotting as that it’s own animal but google “depot eyeshadow” and you’ll find tons of tutorials)
- Cut the magnet sheet to the size as needed. Stick the adhesive side to the bottom of the pans.
3RD STEP: ADD YOUR CUSTOM COLORS AND GLITTER!
- Fill your pans to see how it looks/fits and if the magnets are sticking well.
- You could stop here if you didn’t care what the outside of your palette looks like.
- I have so much glitter left over from my previous glitter projects (here and here) so I wanted to use it and make my palettes even prettier. (ha! I just love any excuse to glitter!)
- I’ve gotten a lot of questions about the mix of glitter to mod podge. You want to make sure that all your specks of glitter are covered in mod podge. This is how you ensure the minimal fall out. 1 parts glue to 2 parts glitter is what I aim for.
- If you have your pans still in the palette, take them out before doing any painting.
- Coat in glitter and let dry between coats. Paint until every single area is covered in glitter!
- Instead of glittering it, you could also just paint the case and it would look just as cute.
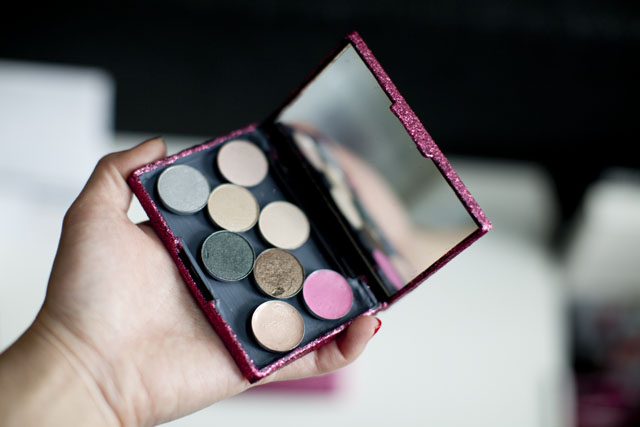
And there you go! A glittery, magnetic case that you can change out the pans to suit your different looks!


*If you are wondering about my makeup palette that I depotted, it is this Hello Kitty for Sephora palette. I loved the colors but hated how big and clunky the case was so I rarely took it out to use it. Now that I’ve depotted all the makeup, I’ve got a fun case to hold other stuff and am actually using the palette now.

18 replies on “DIY Magnetic Makeup Palette”
Fabulous idea! I will be trying it…I have so many single colors that I wish I could fit in one easy case like this! (The singles take up too much space for me!)
You're a goddamn genius! Love this!
That looks so you:-) beautiful and sparkly and reminds me of your pink fabulous sparkly shoes that you once did put on callendar picture
http://www.kameliaandpearls.blogspot.com
That is so smart! I wonder can you paint the back of each pan so you don't have to use the magnetic sheet? That way it would be even neater 🙂 thanks for sharing!
the paint only makes it so that magnetic stuff can stick to it. It doesn't make it magnetic, know what I mean? So you have to have a magnet to stick to the paint. Or you could do vice versa and put the magnetic sheet onto the palette itself and then paint the pans. That's a good idea too!
Thats what I was thinking, it would be easier for me to cut the magnet sheet to fit the box or container I would use, and then just paint the bottom of the pots. Great idea.
This is such a wonderful idea! It would save so much space 🙂 Thanks for sharing!
So smart. I know what you mean though, about having to bring the entire palette when you only use like 2-3 colors. Luckily the Naked2 palette isn't too bulky… but it's not something I want to carry in my purse either!
Thanks for the tutorial!
kat
aneyeforfashion.blogspot.com
Great idea 🙂 Seen a lot of similar ideas and have always wanted to try it 😉
katattack2000.wordpress.com
Brilliant!!! I have the same problem (with too many palettes where I only use one or two colors), so I love this. Hope you post more DIYs in the future! 🙂
Love, S
http://shamelesslyoverdressed.blogspot.com
this is an awesome DIY!
This is such a good idea
thank you
http://pinktistic.blogspot.com/
come follow and comment 😉
Lovely!
http://www.juliemitzie.com
Absolutely love this! Have to tru this soons since I have the exact same problem! Thanks for sharing!
Hannah from I am a lifestyle blog
Cute idea! Check out my blog for crafting ideas as well!
http://purelypapers.blogspot.com/
Love this tutorial Tiff!
xx Vivian @ http://diamondsandtulle.blogspot.com
What a brilliant idea! I have 2 of the old Unii palettes before they actual put the magnetic sheet already in them. I was thinking of buying some adhesive magnetic sheet to put in them. But most of my depotted shadows already have magnets on them so I think if I paint the metal piece inside the Unii then my shadows will stick to it. Then when I get refills of shadows that are already magnetic they will stick too. Thanks for the idea!
You should check out the Z Palette. It's already magnetic, and is universal.. you can put any brand of shadow, blush, gloss in them and mix and match to create your own palette just like you've done here. Plus the lid folds completely under itself, and it has a clear window so you can see what's inside. I love mine – I have a couple. Just like you, I hated taking a whole bunch of different palettes with me for just a few colors. Now I put whatever colors I want to take with me in one palette, and sometimes I even throw a few brushes in there. Love this post – and the do it yourself is really awesome and smart. Just wanted to throw the Z Palette out there since I've loved it so much. 🙂