Categories
baking food Uncategorized

Apricot White Chocolate Muffins

I love dried fruit so when I go to Trader Joe’s I always stock up on their dried fruit.  I grabbed a bag of dried apricots last time we were there and when I got home, decided to try out an apricot muffin.  I’ve never baked an apricot muffin before, so decided to experiment.

I find that muffins always tend to use more butter than I prefer, so I did a little bit of replacing, as I always do, to make them a bit healthier and added ground flaxseed meal.  (I’ve since gone dairy free since making this recipe and no longer use butter at all but that is another post for another day.)  As I mentioned before, I’ve been experimenting with using the flaxseed as a replacement for butter (see my flaxseed oatmeal cookies) so wanted to try it out with the muffins.  I added the white chocolate chips for a little bit of flavor but it wasn’t too much so didn’t overwhelm the taste of the apricots.  I was a bit nervous to how they would turn out but they were so delightfully delicious and moist that I had to write the recipe down and share with you guys.  Everyone that tried them gave them a double thumbs up and was amazed at how moist they were! 

 

Adapted from Apricot Muffins

Ingredients 
1 cup chopped apricots (about 22 apricots)
1 cup boiling water
2 cups all purpose flour
3/4 cup white sugar
1 teaspoon baking soda
1/2 teaspoon salt
3 tablespoons melted butter
3 tablespoons ground flaxseed meal
1/4 cup vegetable oil
1 cup buttermilk
1 egg
1/4 cup white chocolate chips

Preheat the oven to 400 degrees F.  Grease a 12 cup muffin pan, or line with paper muffin
cups. Chop the apricots and place them into a small bowl.  Pour the boiling water over
them then let stand for 5 minutes.

  • In a medium bowl stir together
    the flour, sugar, baking soda and salt. 
  • In a separate bowl, whisk
    together the melted butter, oil, buttermilk, ground flaxseed and egg. 
  • Pour the wet
    ingredients into the dry ingredients and stir until it’s combined.  (it’s fine if the batter is lumpy)
  • Drain water from apricots, and
    mix them into the batter.
  • Add white chocolate chips and mix gently. 
  • Spoon into the prepared muffin cups. 
  • Brush the tops of the muffins with a bit of milk and sprinkle with turbinado sugar (I like my muffins tops more browned and crunchy which is why I do this but you can skip this step if you want.)
  • Bake for 15 minutes or until the top springs back when lightly pressed. Cool in the pan over a wire rack.

 

Categories
baking food recipe Uncategorized

Flaxseed Oatmeal Cookies

I’ve got such a sweet tooth and I try super hard to stay away from sweets when I’m trying to be healthy.  I substitute my cravings for sugar with fruit but a baked good is a baked good and can not be replaced.  I had a bunch of raisins that I wanted to use up so thought to try out a healthy oatmeal raisin cookie.  Now I know that healthy probably isn’t a great word for a cookie as a cookie is still a treat and something that you should indulge in but these cookies use whole wheat flour, ground flaxseed and honey which means no butter and less sugar so in my world, that’s definitely healthy.  The best part is that they are totally yummy and do not taste “healthy” at all.  It’s a great replacement when you are craving oatmeal cookies and you can even sub the raisins with chocolate chips. My husband requested peanut butter chips and they tasted great with those too!

I had bought ground flaxseed meal as I had read that it was a replacement for butter in baking so this was my first time using it.  You can’t really taste it, maybe just a hint of a nutty flavor but it seems to be a fab replacement for butter so I will be working it into other recipes.

1/2 cup Ground Flaxseed Meal
1/2 cup brown sugar
1/4 cup honey
1 egg
1 tablespoon water
1/2 cup whole wheat flour
1/4 teaspoon salt
1/4 teaspoon baking soda
1 1/2 cups rolled oats

  • Preheat oven to 350 degrees F. 
  • In your mixer (or bowl if you don’t have one) mix together the flaxseed meal, brown sugar, honey, egg and water.
  • In another bowl mix the flour, salt and baking soda.  Add the oats and mix well. 
  • Add the dry
    ingredients to the wet ingredients and mix.   
  • If you’d like to make batches with different ingredients (one batch raisin, one batch chocolate chip) split the batch now into different bowls.  
  • Add in the raisins (or other ingredient of your choosing) and mix well into the batter. 
  • Using a spoon, scoop the batter and roll into a ball.  Place onto the cookie sheet. Don’t worry about placing them too far apart as they don’t spread much.  
  • Sprinkle each ball with a little cinnamon (optional but I loved it!)
  • Bake 13 to 16 minutes until edges and top of the cookies are slightly brown. Cool on a wire rack.
Categories
baking food Uncategorized

White Chocolate Coffee Cookies

When I was in college, Whole Foods had this super yummy Latte Cookie that was basically a coffee cookie with white chocolate chips.  I’m not sure why or when they stopped making it in their bakery but ever since they stopped, I’ve been super craving it.  They do have a mocha cookie and another latte cookie now but it’s not the same as the original.  I randomly bought white chocolate chips not knowing what I wanted to make and then suddenly the thoughts of those Latte cookies came to mind and it was a lightbulb moment like DUH why haven’t I tried making them before?

So, these are super simple and easy to make and if you like coffee, you will love these cookies.  Since it’s been so long since I’ve had one I can’t quite remember if they are like the Whole Foods cookies but they are darn good. 🙂

I could not find any instant coffee powder in my grocery store except for this one.  I was a bit skeptical but it was great in the cookie.  (Oh and I got decaf since I was serving them after dinner, I didn’t want to keep everyone up!)
 

Oh and something I learned along the way, do not try to use ground espresso or ground coffee.  It needs to be the instant coffee/espresso powder as they put extra stuff in there and it gives it a way stronger coffee flavor.  Using ground espresso doesn’t give as strong of a coffee flavor that you want in these cookies.  

White Chocolate Coffee Cookies
Makes about 2 1/2 dozen

1/3 cup butter, room temperature 
1/2 cup sugar
1/2 cup brown sugar
1 large egg
1 tbsp milk
1 tsp vanilla extract
1 1/2 cups all purpose flour
2 tbsp instant coffee powder
1/4 tsp ground cinnamon
1/2 tsp salt
1/4 tsp baking soda
1/4 tsp baking powder

Preheat oven to 400 F
Cream together butter and sugars in your mixer or large bowl
In a small bowl, beat egg, milk and vanilla extract together and gradually add to the butter/sugar mixture.
In another bowl, whisk together the flour, coffee powder, cinnamon, salt, baking soda and baking powder.
Add the flour mixture into butter/sugar mixture and mix until combined
Drop dough by rounded spoonfuls, about an inch around, on your lined baking sheet.
Bake until cookie are golden at the edges, about 9-12 minutes.
Cool on baking sheet for 10 minutes before transferring to a wire rack to cool completely.

Sidenote: My favorite tool when making cookies is the cookie scoop.  It was one of those things that I put off buying forever because I was like “do I really need it?” but now that I have it, I can’t imagine not having it when I bake.  The cookies all come out about the same size and I think the texture of the cookie even turns out better.  It’s also great to use when scooping muffin or cupcake batter into the tins.  I love multi-purpose tools!  This OXO Scoop one is the one I use.  

Categories
baking cooking food health healthy eats Uncategorized

Whole Living: 3 Day Reboot Detox

I love to cook but now that my schedule has been so busy, the last thing I want to do after working 16 hours a day is to get in the kitchen and cook.  This has led us to eating out more than we like and I was feeling a bit lethargic and not so healthy in general.  I recently subscribed to Whole Living magazine and I’m obsessed with it.  I read every single article and have really changed our food and eating habits because of it.  I came across this “detox” that sounded perfect for me.  From the magazine:
“New Year’s resolutions a distant memory? Whether you want to recommit to
a healthier eating regimen or simply treat your body to some R&R,
our three-day reboot is a delicious way to do it.”

Last week, I did the 3 day reboot and the rest of the week I stuck to a generally healthy diet.  I ended up losing 3 pounds during the week (which to be honest, was probably just water weight) but not only that, I just feel a lot more “cleaner”, healthier and energized.

Read more for my thoughts and tips on the detox…

I wanted to share with you guys because I often get questions about my diet and exercise which I’m hesitant to post about only because everyone’s bodies are different and I’m certainly no expert.  For me, I generally like to cook/eat healthy for 4-5 days out of the week and the rest of the days we eat out.  Of course this varies and some weeks we eat out more but in general this what we like to stick to.

I’m a huge fan of detoxes every once in awhile and I’ve done them before but I highly recommend this “reboot” because the food is actually tasty!  Also, I know that juice cleanses are pretty big now and I’ve considered them but knowing that I like to eat actual food, I think juice cleanses would just make me feel stabby and probably not fun to be around 🙂

Go to the Whole Living site for more details on the 3 day reboot and the recipes, which are very easy to follow and the best part is, that the first day you prep almost all of the food so that it makes it very easy to stick to the diet for the next two days.  One tip: in the beet salad, they have you put the scallions in the first day which was delicious but I ended up hating it the 2nd and 3rd day because all I tasted were the scallions which as you know, is a very strong flavor.  Next time I will only add them on the day that I eat the salad.

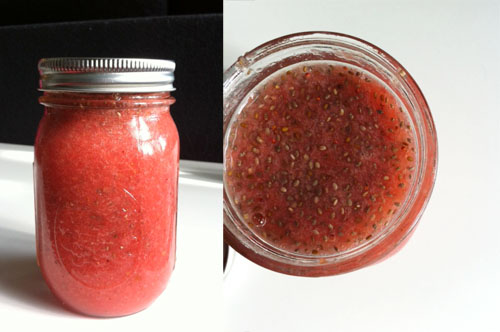
I loved the breakfast smoothie so much that I made it this week too!  I just made a batch on Monday and then filled the rest into mason jars for the next few days.  It’s so easy to grab and go in the morning!  I also add in chia seeds which is an amazing little “superfood” that doesn’t add flavor to your food but it add tons of nutrients.  Read here for the benefits of chia seeds.  I started adding them into my foods for the fiber but I’ve noticed all the other benefits including more energy and help keeping me feel full between meals.  I recommend making a chia gel to keep in your fridge which makes it easier to add to your drinks.  They become softer as I don’t love the crunchiness of the raw seeds but I really like the texture of the chia gel in my drink, it’s like a healthy version of bubble tea!

I order Chia Seeds from Amazon, mainly because I’m an Amazon Prime member and I love the free 2 day shipping so I haven’t really shopped around but I think the price on Amazon is pretty good.

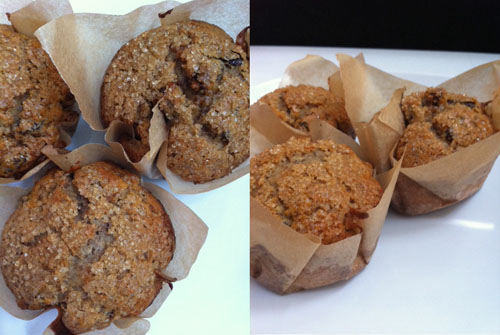
And because if you know me, I can’t not have baked goods in my life.  These are for after the detox obviously but when I need something relatively healthy to munch on with my coffee or tea, I make these raisin bran muffins that are low fat!  They are just as good as any of those muffins you can get at coffee shops but you won’t feel as guilty after eating them.

It uses raisin bran cereal (I get mine at Trader Joe’s), whole wheat flour, only a 1/4 cup of brown sugar for 6 muffins
and no butter at all!  I do suggest to add about a 1/2 cup (or more) of raisins to the batter if the cereal you use is skimpy on the raisins.  I love these muffins and they are really easy to make.  Side note: I make them a little less healthy by adding
turbinado sugar on top but the crunchy topping completes it.  Trust me
on this.
  🙂

Anyway, if you were thinking of doing something like this, I highly recommend the 3 day reboot.  3 days is nothing and is so worth how your body feels after you are done!

Categories
baking food Uncategorized

Strawberry Cake Mix Cookies

So many things to blog about but so little time to do it!!  I’ve been a little MIA on the internets lately because I’ve been meeting with lots of awesome people and getting new ideas and have a few fun projects/events on the way!  Super excited for the next few weeks/months!  So anyway, that’s why these cookies that I made for Valentine’s Day are being posted so late but they are so yummy and work for any occasion, not just Valentine’s Day.  The best part?  They are SO easy to make you won’t even believe it.

valentines_day_roses
Thank you to my husband who brings me flowers for no occasion at all but also never forgets on VDay either 🙂

I like to bake everything from scratch just because I think it tastes better (and any excuse to use my Kitchenaid Mixer – my favorite appliance!) but as I was looking for cookies to make for Valentine’s Day I found these Strawberry Cookies and thought it sounded delicious and then when I saw that they were made simply with a cake mix I was like “WHAAA?”  I have never heard of such a thing!

strawberry_cake_mix_cookies4
Doesn’t the dough look like strawberry sorbet? 🙂strawberry_cake_mix_cookies2strawberry_cake_mix_cookies
strawberry_cake_mix_cookies3

Head on over to Love Veggies and Yoga to get the very easy to make recipe.  All you need is strawberry cake mix, butter, egg and vanilla!  She made a cream cheese frosting which I’m not a fan of so I took an easier way out and bought whipped topping from Trader Joe’s and topped the cookies with sprinkles or made them “whoopie pie” style and sandwiched the whipped topping in between.  These are DELICIOUS and are so easy to make.  Everyone who I gave them to loved them, especially my husband!
My tips on the recipe…
  • Definitely take the time to let the dough chill in the refrigerator/freezer.  They really do spread a lot but they stay thicker if you chill the dough.
  • Make sure that they are cooked through by checking the bottoms of the cookies are browned.  She mentioned that they will be a little loose and jiggly but after you take them out they will cook more on their own.  This usually happens when I make cookies but not for these ones.  I had quite a few undercooked cookies so I ended up cooking mine for about 12-14 minutes as opposed to her 8-10 minutes.
  • You don’t need the cookie scoop like I used but I like to use it so I could get about the same size/shape for the “whoopie pie” style ones.
Categories
baking food photography Uncategorized

Lemon Blueberry Muffin Tops

The best part of the muffin IS the top.  Am I right?  So I HAD to share this recipe with you guys, especially because I found it on accident.  You see, I was in the mood for scones and you know me, I love the combo of Lemon and Blueberry together so I went looking for a scone recipe.  I found this one over at allrecipes.com and I liked the looks of it as it was a bit different than most scone recipes as there was no need to use a pastry cutter (hurts my arms), no heavy cream (didn’t have it), not a lot of butter and used yogurt (you know I like using yogurt better than butter).  Oh and you don’t need to roll it out as they are called “drop scones” which is just that, you drop the dough onto the baking sheet instead of rolling it out and cutting the shape of the scone.  I mean, I love scones but sometimes they can take a bit to make and these just sounded so much easier so I had to try it out. 

 
Turns out, they are nothing like a scone but they are YUMMY in their own right!  They are light and fluffy with bursts of blueberry and lemon flavor.  I was also generous with the lemon glaze as it kind of needed it (they are not that sweet on their own).  After my first bite, I thought, “This is just like a muffin!” which I then saved it into my Springpad* as Lemon Blueberry Muffin Tops!
Go here for the recipe and a few changes that I made were I added lemon juice and used plain yogurt since I didn’t have lemon yogurt.  And before baking I brushed them with egg wash to get the brown color on the tops.
*I use Springpad to keep all my online recipes as it saves them and organizes them very nicely and also has an iPad/iPhone app which is
awesome because I use my iPad as my cookbook in the kitchen and iPhone as a grocery list so I can always reference the recipe when I’m out grocery shopping.
Categories
baking food photography Uncategorized

Lemon Pound Cake (my Light version!)

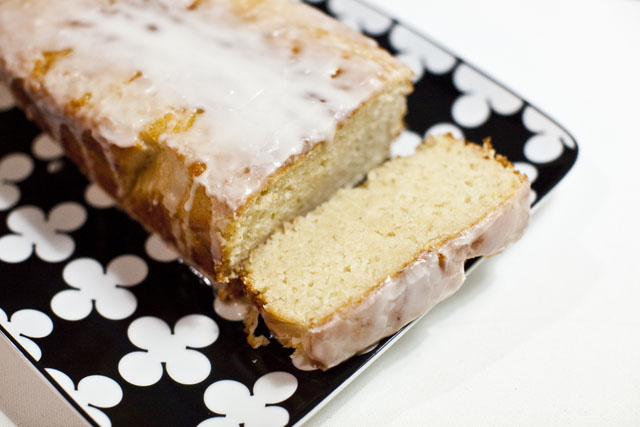
You all know that I love baking and I’m preparing for a full on baking day tomorrow as I’m preparing to make white chocolate bark and cookies to give as gifts and to bring to both of the Christmas celebrations we will be celebrating with my family and my in laws.  (I’m also thinking about making chex mix and muddy buddy mix if I have enough time!)  Before I start all that, I thought I’d share my recipe for a Lemon Pound Cake that I made about a month ago that is to die for and would be a good treat to have on Christmas morning!  While I typically do not believe in substituting “healthy” stuff for stuff that’s supposed to be indulgent (like you will never convince me that “cauliflower mashed potatoes” is as good as the real thing.  I believe in indulging in what you love, just control how much of it you eat),  my one exception is butter.  I don’t like butter.  Yes, I love to bake but I don’t like butter.  I don’t like the taste of it so I always am trying to cut down on how much butter I use when I bake.  I understand that most of the time that you can’t taste the butter and that it just adds to the texture of the baked good, however, in my mind, I still dislike butter so I just try to use as little of it as possible.  I’ve found that yogurt does a great job in replacing butter which is what I did with this Lemon Pound cake and it tastes amazing.  My husband (who does love butter) can never tell when I substitute yogurt for butter and he enjoys this lemon pound cake so much that I had to make another loaf just to freeze and eat it for later.  I cut the butter in half for this recipe as well as used non-fat milk (that’s not an on purpose substitute, that’s the only kind of milk I drink.) but feel free to use low fat or whatever kind of milk you like.  The pound cake still had a wonderful heft to it like pound cake normally does but it also had a light and buttery texture, even without all of the “regular” ingredients.  I also made a lemon glaze and oh man it was yummy!

While I wouldn’t count this as healthy or anything, if you are trying to reduce the amount of butter in your diet or you are like me and don’t like butter, this is a great recipe to try, especially when you are in the mood for something lemon-y!

Lemon Pound Cake (light!)
Adapted from: allrecipes.com 
2 cups all-purpose flour
2 teaspoons baking powder
1 1/4 cup white sugar
1 teaspoon salt
1/4 cup butter
1/4 cup plain yogurt (you can use Greek yogurt too)
1 egg
~1 cup non-fat milk (when mixed with egg)
1 teaspoon vanilla extract
3 tbsp lemon juice
1 lemon, zested

Glaze
2 cups of sifted powdered sugar and
1/3 cup lemon juice

1. Preheat oven to 350 degrees F. Grease a 9×5 loaf pan.
2. In a large bowl, mix flour, baking powder, and salt.
3. In another bowl (or in your stand mixer), cream together butter, yogurt, and sugar. Break 1 egg into a measuring cup and then fill to the 1 cup line with milk. Add to butter/sugar mixture and beat well. Add vanilla, lemon juice and zest. Add dry mixture and mix well.
4. Pour batter into the loaf pan. Bake for 40 minutes or until a toothpick inserted into the center of cake comes out clean.

For the glaze: mix together powdered sugar and lemon juice until desired consistency. Let cake cool completely before pouring glaze over cake.