Categories
DIY halloween Kids Layla momlife mommy style tutorial Uncategorized

DIY Unicorn Costume Tutu – Halloween Costumes for mom and daughter

Can you believe it’s almost halloween? I’m proud that I’m actually ahead of the game this year which is why I’m sharing this DIY unicorn costume tutu!  The past few years my daughter has been happy with being Minnie Mouse or a Disney Princess so we just headed to the Disney store for her costumes, but this year, she had several ideas that required me to be a bit more creative.

EASY DIY UNICORN COSTUME FOR MOMMY AND DAUGHTER

She’s been obsessed with unicorns, as well as all her friends (every birthday party we’ve been to lately is unicorn themed, including hers!) and I knew I wanted to make the unicorn costume. I’m also realistic and know that I don’t have that much time nor did I want to spend a ton of money so I wanted something easy to make and comfy for her to wear.  This costume fit all that criteria!

Mommy and Daughter DIY Unicorn Halloween Costume

DIY UNICORN TUTU COSTUME

I got the idea to make a DIY unicorn tutu and it turned out so cute!  You really don’t need many supplies and the part that takes the longest is dyeing the tulle but everything else comes together so fast!  I didn’t want to buy the tulle skirt as I wanted to glitter it and didn’t want to spend a lot of money on a skirt that she probably would just wear for the costume.

I partnered with Rit Dye on my instagram and they had sent over a few bottles of dye that I could use.  I’ve never dyed tulle before so I was a bit nervous but the project was a lot easier than I had anticipated!

Unicorn Tutu Tutorial - dying tulle with Rit Dye

Materials for the DIY Unicorn Costume:

DIY Glitter Unicorn Tutu Tutorial

Measure your child’s waist and how far down from the waist you want your tutu to fall.

For the ribbon –

Take the measurement of the waist and then triple it and then add 6 inches.   My daughter’s waist is 21 inches and I cut my ribbon 69 inches (21 x 3 = 63 + 6 = 69).  Adjust as you need but this gave me the right amount of ribbon to be able to tie it on her waist easily.

Find the center of the ribbon by folding it in half and then measure out from there to get the waist measurement.  So half of 21 is 10.5 so I measured that out from the center and then marked it with a pen.  I knotted both spots that I marked so that the area in between should be the measurement of the waist.

Unicorn Tutu Tutorial - dying tulle with Rit Dye

For the tulle –

Take the measurement of how long you want the skirt to be and then double it.  I measured 12 inches from her waist down so I cut my strips of tulle at 24 inches.  If you buy the tulle on the spool like I did (rather than the the full yard of tulle like you get at the fabric store) it makes it go by faster.  But if you do buy the tulle by the yard, just cut out 6 inch strips first before you cut the length of the tulle for the skirt.

I ended up cutting about 120 strips.  Since I was dying my tulle different colors, I wanted to make sure that I had enough. Obviously this is going to be different for you depending on the waist measurement.  I think I ended up using around 100 strips total and the skirt was quite full and fluffy.

DIY Unicorn Glitter Tutu Tutorial

Dying the tulle – 

Follow the directions on the bottle depending on how much fabric you are dying.  I filled up a big pot of water and put in half the bottle of dye and let it come up to a boil.  Pull the pot off the heat and then put in the strips of tulle, I made sure that I pulled them apart and put them in one by one to avoid them sticking together and creating uneven spots in the dye. Continue stirring so that every piece would be covered and evenly dyed.  With tulle it’s a bit hard to tell how much dye is getting on there as you pull a piece up and it basically is see through!  I kept on checking and trying to figure out if it was pink enough.  I ended up letting it soak for over 30 minutes with continual stirring.  When I pulled it out it, it was a really pretty shade of light pink which obviously as you can see in the photo below, the dye makes it look like it will come out a lot darker!  Do the same steps for the remaining colors that you want to dye.

Let the strips of tulle dry.  I used our clothes drying rack (the one we have is huge so it fit all the strips perfectly) making sure to add plastic or newspapers underneath in case the dye drips.  Luckily the tulle dries very fast so I could move on to glittering!

Unicorn Tutu Tutorial - dying tulle with Rit Dye

How to glitter tulle –

I used a mixture of glitter and modpodge – similar to my glitter everything tutorial – to add the glitter to the tulle.  Lay the strips down on the floor (we had plastic covering on the floor to make it easier to clean up) and used a foam brush to paint the mod podge/glitter mixture on the tulle strips.  I got my daughter involved in the process and she loved it!

Let the strips dry – I just placed them on the clothes drying rack so that they wouldn’t stick to each other.  The next morning they were ready to go!

Mommy and Daughter DIY Unicorn Halloween Costume

HER OUTFIT: TEE \\ LEGGINGS \\ SHOES \\ PUMPKIN \\ UNICORN HORN
MY OUTFIT: DRESS \\ SHOES


Making the DIY Tulle Tutu Skirt – 

Fold the tulle strip in half and slide it underneath the ribbon.  Make sure to start at the end that you knotted so you know where to begin/end.  Loop the long ends of the tulle into the little loop that you had created and pull tight.  This part is a bit hard to explain but if you watch this tutorial, it’s a lot more helpful! I alternated colors of tulle so that it would be a pretty mix.  This process goes by fast once you get the hang of it. I think I made her skirt in less than 20 minutes.

Pop on the skirt to make sure that it’s the fullness that you like and add or take away strips of tulle as needed.  The rest of the outfit comes together easily!

Mommy and Daughter DIY Unicorn Halloween Costume

I wish you could see the colors and the glitter more as they don’t show in the photos but in person, it’s so pretty!  I love the more intricate unicorn horns but my daughter always just takes off those kinds of headbands so these ones with the elastic are a lot better for younger kids.  I added a bit of glitter to her face which was cuter in person than in photos 🙂

DIY Unicorn Glitter Tutu Tutorial

I didn’t end up making a tutu for myself, because, well, #momlife.  You end up getting so busy but as long as your child has a cute costume that’s all that matters right?  So I put on a white dress that I already own, my sparkly shoes and a horn to match with her!  My daughter loves twinning with me so she was so happy to see me dressed as a unicorn too.

Mommy and Daughter DIY Unicorn Halloween Costume

These unicorn shoes are one of her favorite shoes ever, she wears them so much.  They are available here and come in pink too!

I did want to share with you how easy it was to just pop the tutu over my white dress and create a costume for myself!

DIY Unicorn Glitter Tutu Tutorial

I hope this tutorial helped!  It really only took me one night and the results were so much better than I expected!  I also spent less then $20 on everything so that was a definite win!  I’ve got another mommy and me costume coming up soon so if you haven’t yet, subscribe to my newsletter to keep up to date on my posts!

For more fun Halloween ideas check out my DIY Minnie Mouse and Snow White costumes!

Categories
beauty Hair tutorial Uncategorized

Creating volume with your flat iron

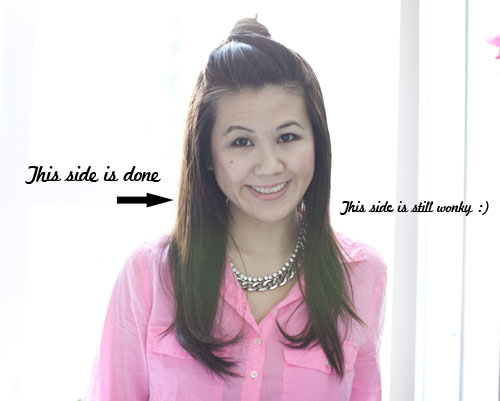
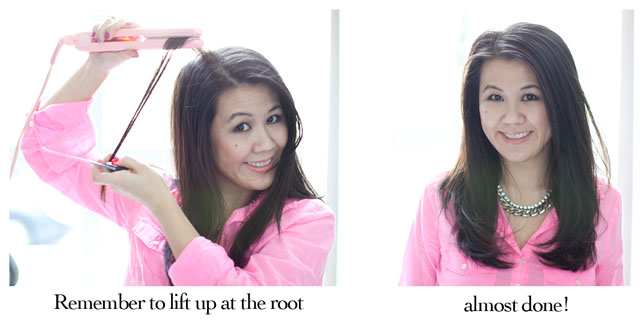
 I usually use my flat iron to curl my hair (see my video tutorial) but lately I’ve been wanting sleek straight hair instead of my usual curls.  I usually just blow dry my hair straight and leave it but it’s been so bleh lately and no matter how much teasing I did, I’d never get the volume that I get when I curl my hair.  I finally put two and two together and thought about giving my hair volume the same way that I curl my hair but just leaving it straight instead.  Whenever I thought about using my flat iron to straighten my hair, I always had the idea of just taking it straight down and getting straight hair that way.  It never occurred to me (until now) that all you need to do is to just lift up at the roots before gliding it down which is where the volume comes from.  Really, it’s that simple!  And this may be something that a ton of you already know but since I just recently discovered it and now love doing my hair like this I thought I’d share my tutorial.  It only takes a few simple steps to have sleek and voluminous straight hair.

The tools: Solia 1″ Flat Iron | Blow Heat Protective Styling Mist | Oscar Blandi Dry Shampoo | Teasing Brush

 
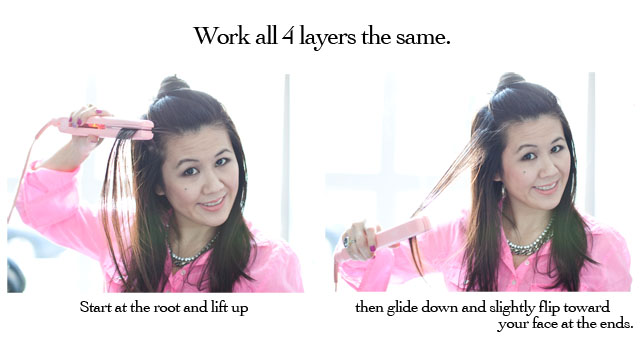
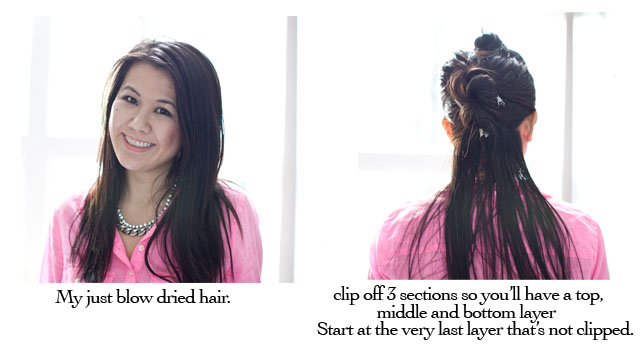
Make sure to spray your hair with the heat protectant spray before you start.  (I skipped showing you the bottom 2 layers as it was easier to photograph the top 2.  The technique is the same)

 
The trick is after you lift at the roots, bring it down in a curve, kind of like you are drawing the letter C.

 
At this point, you should have a lot more volume all around and sometimes I just stop at this step depending on how cooperative my hair is that day.

 
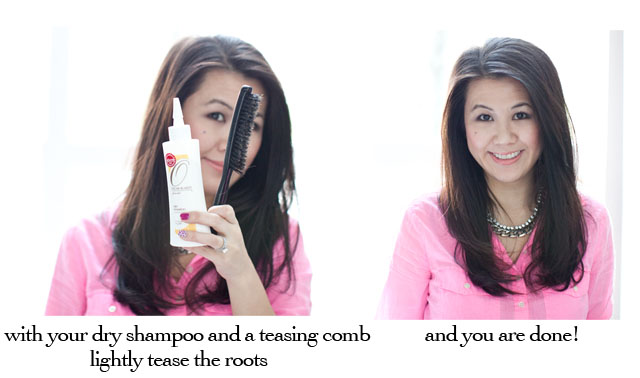
I need the dry shampoo for the texture in my hair to hold the tease but if you don’t need it, you can skip it.  The teasing should be very light as you already have the volume there, you just want to bring it up a little and smooth it out.

I completely wasn’t thinking and didn’t take pictures of the sides and the back of my hair for comparison but if the pictures don’t show it well, it really does give good volume all around.  I know it’s not revolutionary or anything but for someone with very thick hair that gets weighed down a lot, this has been a great and easy way for me to style my hair and keep the volume without a lot of product and teasing.  I hope it’s helpful for some of you too!

I’m wearing a J Crew top and our brand new Luxe Chain Crystal Necklace – it’s my favorite piece, I wear it all the time!

Categories
Hair tutorial Uncategorized video

Hair Tutorial: Glam Curls

glam_curls3


Like my videos? Subscribe here!

glam_curls4

I think I’ve gotten requests from readers to do a hair curling video every week over the past year and I keep on making excuses as to why I couldn’t do one.  Well!  I finally decided to suck it up and do one.  Not gonna lie, I’m a bit afraid to do tutorials because I’m no expert at make up or hair, I just know how to do my own.  I’m not pretending to be a hair stylist or nothing, it’s just what I’ve learned is the best way to style my hair.  But I made the video because I love you guys.  🙂  Anyway, hope you like it and helps out in some way for your own hair!  I do apologize it’s kind of a long video, I actually edited so much out of it but there’s just no way to curl my hair in 5 minutes!

In the video I used these products:


You can now buy my beloved curling lotion at Amazon!  Also love this styling spray and there’s even a straightening spray!


The best lightweight hair cream that I’ve used.  I run it all through my hair and it helps keep the frizzies away and keep the curls looking pretty.
Yuko Repair Through Leave in Conditioner

Thank you to Hazuki from Yuko for sending me this!  It really has helped my split ends and I really like that it helps protect my hair from the heat of the blow dryer and curling iron.

T3 ‘Twirl’ Curling Iron (1 1/4″)


It’s not cheap but I’ve justified the cost by using it almost every day for a year and a half!  It slides through my hair really smoothly, especially with the way I curl my hair.  The ones I’ve used previously kind of would stick to my hair and tug at it when I slid it through my hair.

Also check out my All About Hair post for some of the other products that I use.

In the video I’m wearing the Yumi Kim Kalie Top in Ebony Rose. (It’s on sale for $50 now!  Go get it!)  Loves this print, I bought it in the Cissy dress as well and wore it to our company holiday dinner party.  Oh and since I get a lot of questions about Yumi Kim sizing, I wear an XS and it fits TTS except for some of their flowy tops which are a bit on the big side (but I guess since it’s flowy, it’s fine.)  The necklace is the Tiffany & Co. Lock Charm (it comes in every letter of the alphabet).  Bracelet is from Madewell and ring is the double finger ring by Erica Anenberg.

Categories
beauty Hair tutorial Uncategorized

The Poof

vintage_gucci_bagvintage_gucci_bag

How to “poof” your hair without looking like Snooki. 😉

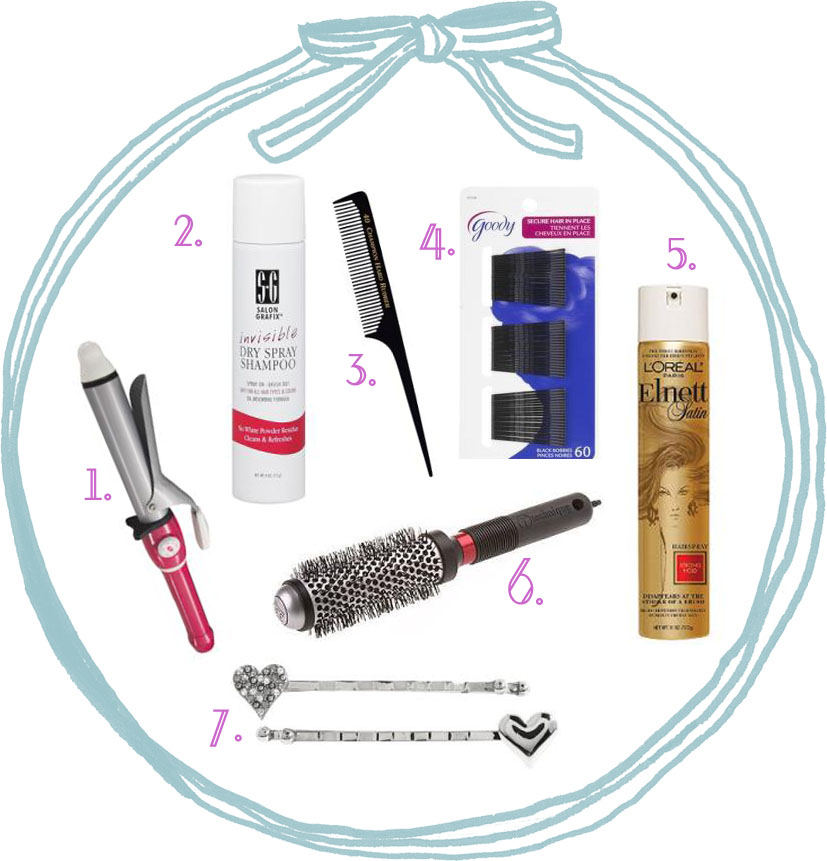
(the #’s correspond to the product list below)

  • Curl the bottom of your hair with a curling iron (#1), just for a slight curl (not necessary but I did for this look)
  • Using a rat tail comb (#3), divide the section at the top of your hair that you want to poof.
  • Spray that section, with dry shampoo to give it some texture.  I used this one which was gifted to me by Salon Grafix (#2) and it worked really well.  (as a side note, this dry shampoo does not work well to absorb oil for a “non hair wash day” but works great as a styling product – in my experience at least)
  • Tease the part of your hair – with the rat tail comb (#3) – that you want to pull up, paying attention to the underlayers to give it a bigger poof.
  • Clip the sides back with bobby pins (#4) at a slightly high part at the back of your head
  • Using a round barrel brush (#6), smooth out bumps and pull sightly to give the sides a bit of a poof.  I find that the round barrel brushes are easier to do that then a regular brush.
  • Gather the middle part that is teased and bobby pin to the same area as the sides are clipped to
  • Use the same comb (#3) that you tease with, gently pull out more hair, the more you pull, the bigger the poof will be so make sure not to pull too much!
  • I used about 6 or 7 bobby pins to hold up my hair so don’t be afraid to use as many as you need to make sure it’s secure!
  • Comb out your bangs and then use a bit of hairspray (#5) to hold everything together and you are good to go!
  • Add an “accent” bobby pin (#7) for some sparkle to your hair!

Products used:
1. T3 Bespoke Labs ‘Twirl’ Curling Iron (1 1/4″)
2. Salon Grafix Invisible Dry Spray Shampoo
3. Champion Rat Tail Comb 8″ Edged Back Wide Teeth
4. GOODY Bobbypins
5. Elnett Satin Strong Hold Hair Spray
6. Technique Thermal Round Brush with Tourmaline
7. Marc by Marc Jacobs Love, Marc Bobbies Hair Accessories

vintage_gucci6